The Workflow Editor
The workflow editor
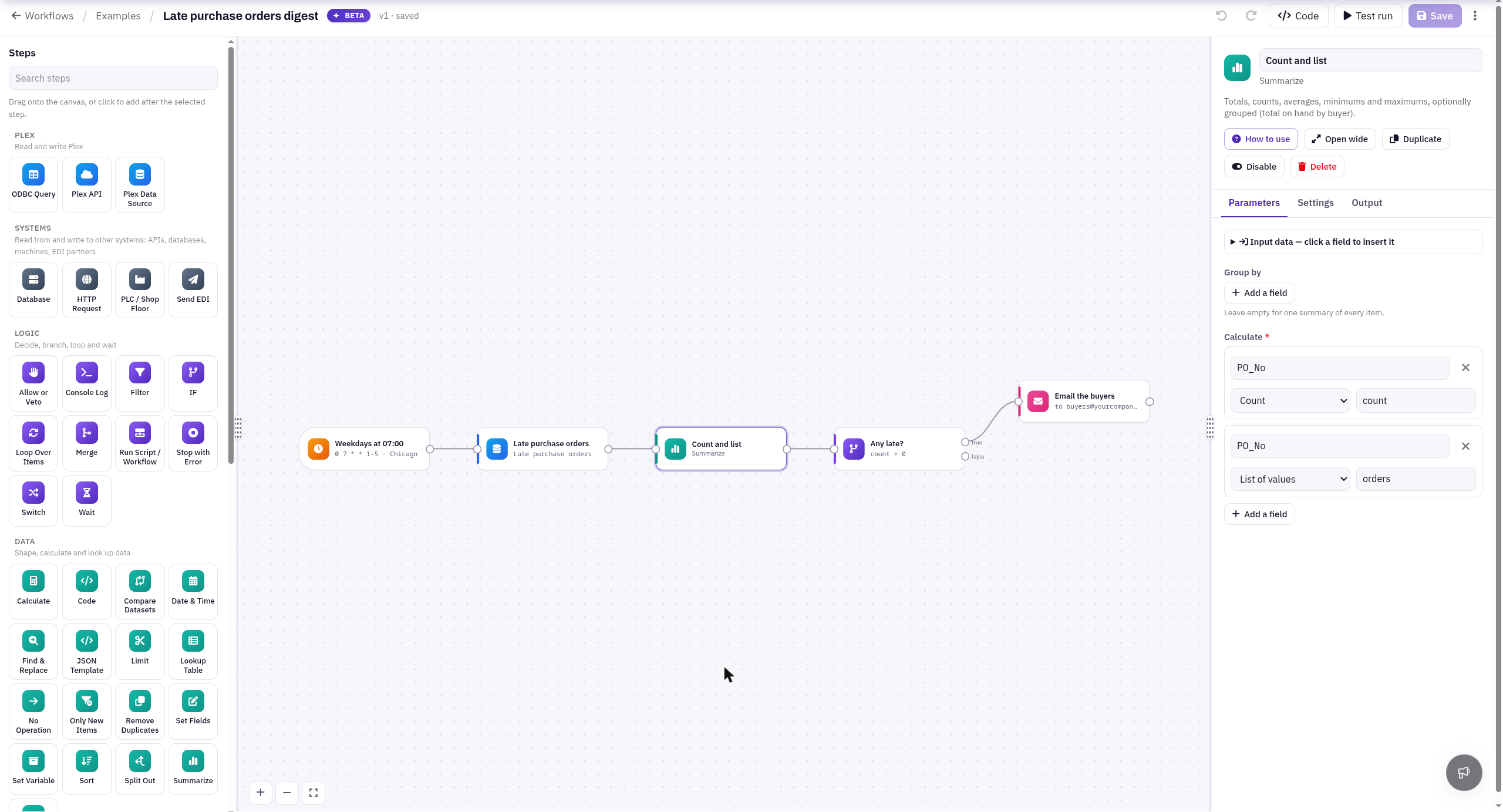
Open a workflow from Script Engine › Workflows to edit it. The editor has four parts:
- Steps (left): the palette of every step you can add, in groups.
- The canvas (middle): your workflow, as steps joined by connections.
- The side panel (right): the selected step's settings, or the workflow's settings when no step is selected.
- The toolbar (top): the workflow's name and folder, its version and save state, a count of problems, and the Undo, Redo, Code, Test run, Save and ⋮ (more) buttons.
Every pane can be resized by dragging its edge.
The canvas
Adding steps
- Drag a step from the palette onto the canvas.
- Click a step in the palette to add it after the selected step, already connected.
- Double-click an empty part of the canvas to open Add a step…, a searchable list. Type a few letters and press Enter to add the first match.
Use Search steps at the top of the palette to find a step by name or by what it does. Start every workflow with a trigger from the Triggers group. A workflow has one trigger, so the palette hides the others once you add one.
Connecting steps
- Drag from a step's output (the dot on its right) to another step's input (the dot on its left), or drop it anywhere on the step.
- Drop a connection on empty canvas to add a new step there, already connected.
- Steps with more than one output, such as IF (true / false) and Switch, show each output's name.
- To remove a connection, click it and press Delete.
Rejoining branches
Branches can join again at any step. Connect the end of each branch to the same step, and that step runs with whatever items arrive. A branch that received no items is skipped, along with everything after it on that branch only. You only need a Merge step to combine branches in a particular way, such as matching items by part number. A No Operation step makes a handy named meeting point.
Moving around
- Pan: drag an empty part of the canvas, or scroll.
- Zoom: Ctrl+scroll, or pinch on a trackpad or touch screen, or use the + and − buttons in the corner.
- Fit to screen: the button in the corner, or press 1.
- Select several steps: Shift+drag a box around them. Ctrl+A selects every step.
Copy, paste, duplicate and undo
| Keys | Does |
|---|---|
| Ctrl+C / Ctrl+V | Copy and paste the selected steps, with the connections between them. You can paste into another workflow. |
| Ctrl+D | Duplicate the selected steps. |
| Delete | Remove the selected steps or connection. |
| Ctrl+Z / Ctrl+Shift+Z (or Ctrl+Y) | Undo / redo. |
| Ctrl+S | Save. |
| Escape | Clear the selection and show Workflow settings. |
| F9 | Add or remove a breakpoint on the selected step. |
On a Mac, use Cmd in place of Ctrl.
Problems
The editor checks the workflow a moment after each change. A step with a problem shows a red or amber badge; hover over it to read the message, or open the step to see it beside the field. The toolbar shows how many problems there are. Problems (red) must be fixed before you can save; warnings (amber) do not stop a save.
The step panel
Click a step to open it in the side panel. At the top are its name (click to rename it) and these buttons:
- How to use: what the step is for, how to set it up, what comes out, an example, tips, and the Values and functions list for expressions.
- Open wide: the wide step view (below).
- Duplicate, Disable (a disabled step passes its items through untouched) and Delete.
Below are tabs:
- Parameters: what the step does. After a test run, Input data at the top lists the fields of earlier steps; click one to insert it into the field you were last typing in.
- Settings: Run (once for each item or once with all items), what to do when the step fails, retries, variables, notes, pinned data and the breakpoint. See Step reference.
- Output: what the step put out on the last test run, and any lines it logged.
- Preview (Send Email, Generate Document and Generate Documents (batch)): the template rendered with an item's data from the last run. Nothing is sent.
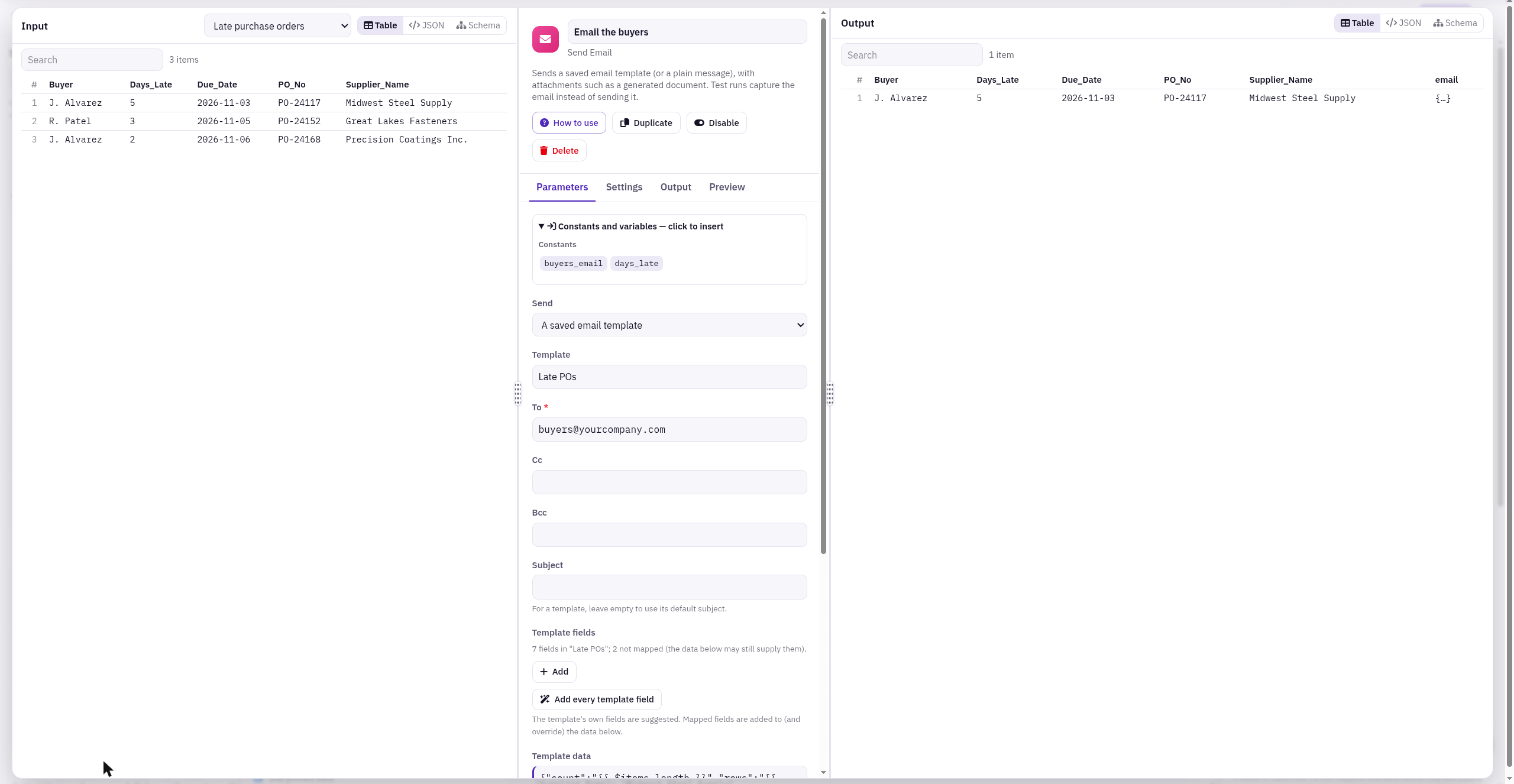
The wide step view: Input | Form | Output
Double-click a step (or click Open wide) to see three panels side by side:
- Input: the items this step received on the last test run, from each step connected to it, plus earlier steps it can refer to by name.
- The form: the step's Parameters, Settings and Output tabs.
- Output: what this step put out, per output (and per pass, inside a loop).
Show the Input and Output panels as a Table, as JSON, or as a Schema (the field tree). Each has a search box and pages of 20 items.
Drag a field from the Input or Output panel onto a form field to insert the expression for it, such as {{ $json.qty }}, or {{ $('Get parts').json.qty }} for an earlier step. Clicking a field inserts it into the field you were last typing in. Press Escape to close the wide view.
Workflow settings
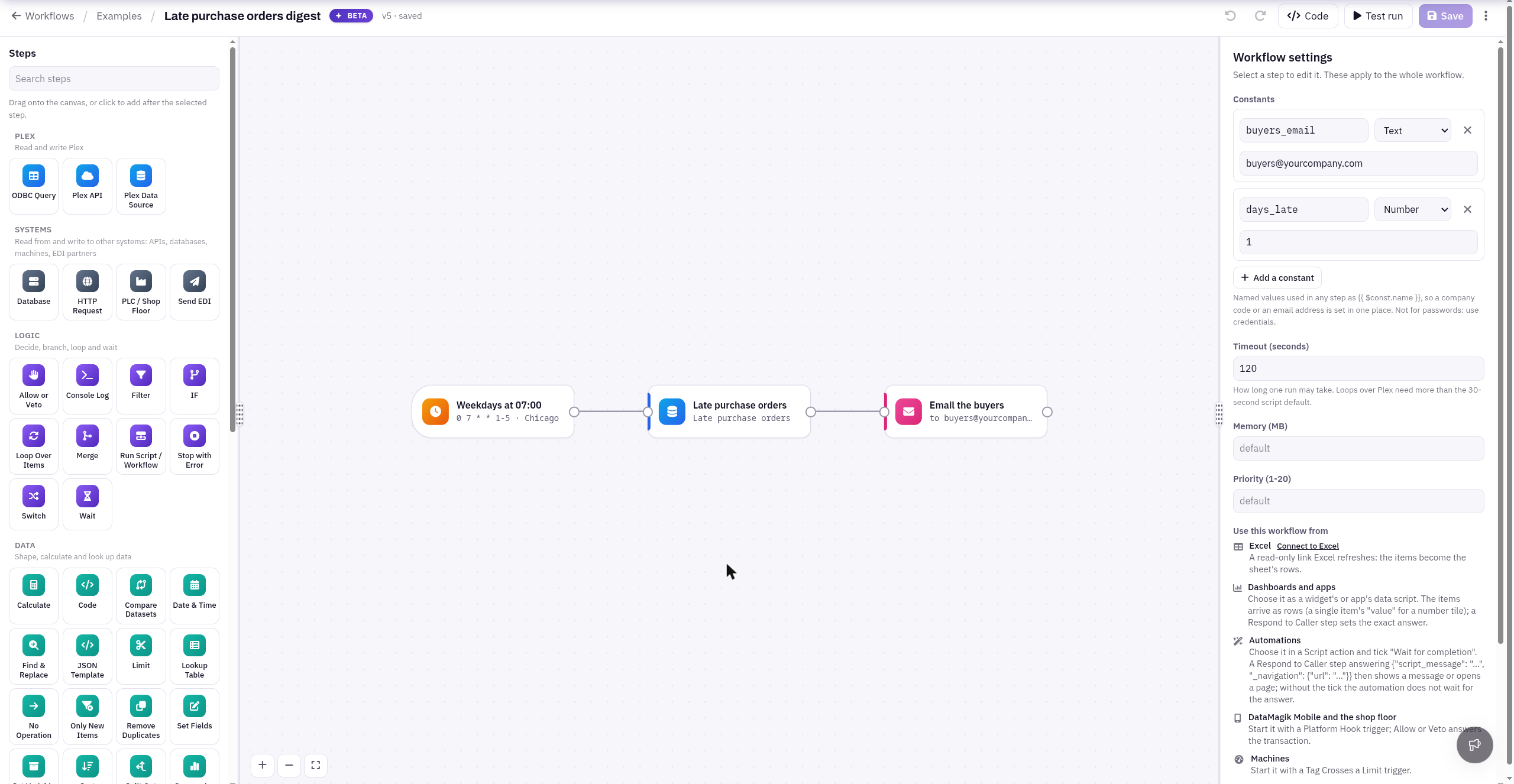
Click an empty part of the canvas (or press Escape) so no step is selected. The side panel shows Workflow settings, which apply to the whole workflow:
- Constants: named values used in any step as
{{ $const.name }}, such as a company code or an email address. Each has a type: Text, Number, Yes/No or JSON. Not for passwords: use credentials. - Timeout (seconds): how long one run may take, from 5 to 3600. Workflows that loop over many Plex calls, or use a Wait step, need more time.
- Memory (MB) and Priority (1-20).
- Use this workflow from: the places in DataMagik that can run this workflow. See Workflows in production.
- AI assistants: offer the workflow to AI assistants as a tool. See Workflows in production.
Constants, timeout, memory and priority are saved with the workflow. The AI assistants section has its own Save AI settings button.
Saving and versions
Click Save or press Ctrl+S. The button is greyed out when there is nothing new to save. The toolbar shows the version and whether there are unsaved changes, such as v4 · unsaved changes. The browser warns you if you try to leave with unsaved changes.
- Each save creates a new numbered version, and that version is what scheduled, API and other real runs use from then on.
- If a step has a problem, the save is refused with Fix the marked steps before saving.
- Saving also sets up what starts the workflow (its schedule, file watch, email address, hook or tag watch). If that cannot be done, the version still saves and the trigger shows a warning.
Test runs do not need a save: they run the canvas as it is. Save before relying on the workflow anywhere else.
When someone else saved first
If a colleague saved the same workflow after you opened it, your save stops and asks Someone else saved this workflow. You can:
- Save over theirs: your canvas becomes the new version and their changes are no longer current.
- Cancel, then reload the page to see their version. Your unsaved changes are lost when you reload, so copy any steps you want to keep first (Ctrl+C) and paste them after.
Earlier versions
The workflow editor does not list earlier versions. The Script Engine's version history works for a workflow (open it in the Script Engine with Shift+click), so you can view an earlier version's generated code, but a workflow cannot be reverted from there.
The ⋮ menu
- Run up to "step name" and Add breakpoint (F9): see Testing workflows.
- Export as JSON: download the workflow as a
.workflow.jsonfile. - Import JSON (replaces the canvas): load a workflow file over the canvas. Save to keep it.
- Duplicate workflow: make a copy, in the same folder, under a new name.
- Schedule it…: open the Script Engine's Schedules page.
- Delete workflow: its schedules and API calls stop working.